Your CPU needs a certain amount of time to process audio samples. We
recommend that you optimise your computer for audio processing and
disable any unnecessary applications.
The ADAT format allows 8 channels of digital audio on a single optical connector, but only at sample rates up to 48kHz.
At 88.2kHz and 96kHz, the S/MUX format must be used instead. S/MUX is a
way of squeezing higher frequency signals into an ADAT carrier. Twice as
many samples are transmitted for each channel, so there can only be
half as many channels.
Starting with driver version 1.05, there are two settings for the
buffers. These relate to Windows operation only; you don’t need to set
buffers on a Mac as it’s handled automatically. The “base” setting is
for the USB connection and relates to both WDM and ASIO operation. The
ASIO buffer settings have no effect on the WDM drivers. The default
settings are designed to be safe with any modern PC and will only need
adjusting if you want to reduce the latency in the system or if you are
experiencing glitches. In either case, please see the technical note on buffer settings in Windows USB drivers for a more detailed discussion.
For best results, ensure that you set one box as the clock master and
the others as slaves. On the USB Audio control app, ensure that the
Slave boxes are sync’d to the master with a WCK or DI connection.
If you do this, you should uncheck the ‘Drift Correction’ box.
Multiple Titan and Atlas units can also be connected to a Pro Tools | HDX card, Pro Tools | HD Native PCIe card or Pro Tools | HD Native Thunderbolt unit, and they will to operate in sample sync in Pro Tools | HD software. These interface devices work as Core Audio devices that can be used with software other than Pro Tools | HD.
Multiple Titan and Atlas units fitted with MDIO-Dante modules will operate in sample sync when connected to a Dante system and synchronised correctly. Dante Virtual Soundcard or a Dante PCIe card both can be used as the host interface in system like this.
Operating over USB under ASIO and WDM – No. The ASIO and WDM Audio
drivers connect to the first box that the PC detects on the USB bus.
Multiple Titan and Atlas units can be connected to a Pro Tools | HDX card, Pro Tools | HD Native PCIe card or Pro Tools | HD Native Thunderbolt unit, and they will to operate in sample sync in Pro Tools | HD software. These interface devices come with ASIO drivers that can be used with software other than Pro Tools | HD.
Multiple Titan and Atlas units fitted with MDIO-Dante modules will operate in sample sync when connected to a Dante system and synchronised correctly. Dante Virtual Soundcard or a Dante PCIe card both can be used as the host interface in system like this.
Installing the Lyra, Titan, and Atlas Control Panel app and the Callia firmware updater.
This is a Mac pkg or mpkg file, and under modern MacOS there is a
possibility that Security settings may disallow you from installing
software that isn’t downloaded from the Apple app store.
In System Preferences / Security & Privacy, the General page has a setting called
“Allow apps downloaded from:”
The options in OSX up to Sierra were:-
App store
App store and identified developers
Anywhere
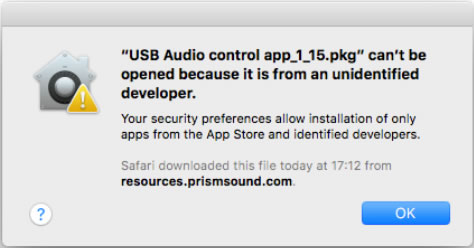
However in Sierra 10.12.0 and higher, the “Anywhere” option has been
removed. Running the “USB Audio Control app” installer package may
initially fail under Sierra with a message like this:-
It may fail depending on that setting under an earlier MacOS too.
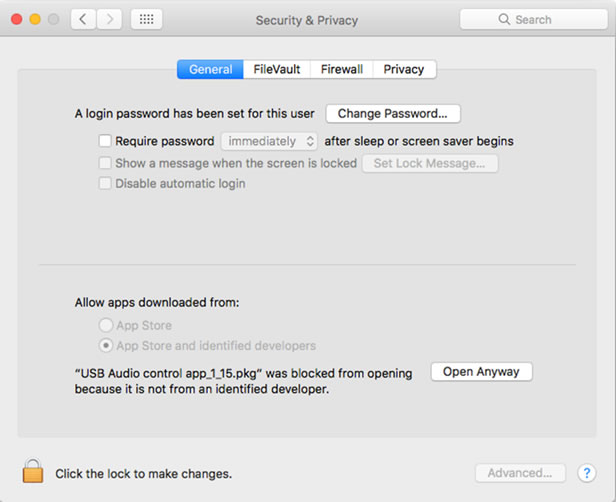
However when this happens in Sierra, if you go into the Security &
Privacy Preferences, it will now show an option to run this particular
installer package:-
and pressing the “Open anyway” button will run the installer unimpeded.
Note that the firmware uploading will reset your settings. We
suggest that you save them before the firmware upload, so that you can
reload them afterwards. Also we advise that you take special care over
the volume control if you normally use it. Make sure that you re-assign
the volume control and turn it down before playing audio.
Disconnect the power lead from your box.
Hold down both the standby button and the volume encoder button whilst reconnecting the power. LEDs will remain off.
Ensure that the USB cable is connected to the host computer.
Run the Prism Sound USB control app. You should see the bootloader dialogue pop up.
Click ‘Browse’ & select a firmware file.
Click ‘Load’.
When the load is completed, restart the box by clicking ‘Launch’.
Reload your settings, and check the operation of the volume control before playing any audio.
You can see how this popup was set up in our step-by-step guide: https://wppopupmaker.com/guides/auto-opening-announcement-popups/
You can see how this popup was set up in our step-by-step guide: https://wppopupmaker.com/guides/auto-opening-announcement-popups/
You can see how this popup was set up in our step-by-step guide: https://wppopupmaker.com/guides/auto-opening-announcement-popups/
You can see how this popup was set up in our step-by-step guide: https://wppopupmaker.com/guides/auto-opening-announcement-popups/
You can see how this popup was set up in our step-by-step guide: https://wppopupmaker.com/guides/auto-opening-announcement-popups/
You can see how this popup was set up in our step-by-step guide: https://wppopupmaker.com/guides/auto-opening-announcement-popups/
Privacy Overview
This website uses cookies so that we can provide you with the best user experience possible. Cookie information is stored in your browser and performs functions such as recognising you when you return to our website and helping our team to understand which sections of the website you find most interesting and useful.
Strictly Necessary Cookies
Strictly Necessary Cookie should be enabled at all times so that we can save your preferences for cookie settings.
If you disable this cookie, we will not be able to save your preferences. This means that every time you visit this website you will need to enable or disable cookies again.
3rd Party Cookies
This website uses Google Analytics to collect anonymous information such as the number of visitors to the site, and the most popular pages.
Keeping this cookie enabled helps us to improve our website.
Please enable Strictly Necessary Cookies first so that we can save your preferences!