Recent versions of Chrome include a security measure which ensures that all frames of a web page originate from the same domain. Unfortunately, locally hosted pages incorrectly trigger this safeguard since they have no domain.
The effect of this is that the navigation pane on the left-hand side of the help does not operate correctly: you can click on the main chapter headings, and navigate to these, but you can’t expand them to view or access the subsections. You have to scroll down through the subsections using the arrow buttons in the main pane. This problem only affects Chrome, and only when displaying pages from the local computer.
Workarounds include:
- Use a different default browser
- Access the help pages via this website, or a local webserver
- Use the PDF manual instead
- Start Chrome with the -allow-file-access-from-files switch
In order to use Lyra with Windows Media Player and other Windows sound apps, you must install drivers version 1.03 or higher.
Please also ensure that you have firmware 1.03 or later installed.
It is possible to operate Lyra without a connection to a host computer, for example, in a hi-fi set-up. This is done by setting up the unit as required using the Lyra Control Panel app from a host computer, then re-starting it without the computer.
The steps to achieve this are as follows:
- Connect the Lyra to the host computer using the USB connection
- Configure the Lyra using the control panel application so that it works how you want it to
- Place Lyra in standby by pressing the standby button (far right on the front panel)
- Disconnect Lyra from the host computer USB connection and the power source
- When the unit is re-powered and detects that no USB connection is active, it reloads the settings which were last used.
All of the outputs on the Lyra have mixers which determine how the output is derived from the various input signals. This allows you to connect the digital input pair to one or more analogue output pairs, and to connect the analogue input pairs to the digital output pair. Thus stand-alone mode can be used to configure a stand-alone D/A converter and A/D converter, with static mixing if required.
When in stand-alone mode, if Lyra is set to use an external synchronization source, (eg, a digital input, Wordclock or ADAT), then the sample rate will follow the sample rate of the external source. If the designated synchronization source is not connected, Lyra will use its internal clock at the selected sample rate.
Your CPU needs a certain amount of time to process audio samples. We recommend that you optimise your computer for audio processing and disable any unnecessary applications.
For more information, please read the guide to “Optimizing your Windows PC for audio”. See also the technical note on buffer settings in Windows USB drivers for a detailed discussion specific to Prism Sound USB products.
It is very easy to measure the round-trip latency of your audio interface using a DAW and a digital cable.
Use these steps:
- Open your DAW and select your audio interface driver.
- Create a track with outputs set to the interface DO (i.e. outputs 9 & 10).
- Select a clip with a sharp attack, like a snare hit.
- Create another track with inputs set to the interface DI (i.e inputs 9 & 10).
- Arm recording on the second track.
- Connect the digital ports back-to-back using a suitable digital cable.
- Use your transport bar to play & record simultaneously. You will see the clip recorded on the second track, delayed by the round-trip latency.
- Most DAWs have a ‘delay’ value that can be set on the second track. Use this to offset the record time.
- Continue changing the delay time & re-recording the clip until the two clips line up perfectly.
Your delay value will be the precise round-trip latency.
You can verify the delay with a null test. Invert the recorded track & mix with the original; the samples will cancel out exactly.
The ADAT format allows 8 channels of digital audio on a single optical connector, but only at sample rates up to 48kHz.
At 88.2kHz and 96kHz, the S/MUX format must be used instead. S/MUX is a way of squeezing higher frequency signals into an ADAT carrier. Twice as many samples are transmitted for each channel, so there can only be half as many channels.
Starting with driver version 1.05, there are two settings for the buffers. These relate to Windows operation only; you don’t need to set buffers on a Mac as it’s handled automatically. The “base” setting is for the USB connection and relates to both WDM and ASIO operation. The ASIO buffer settings have no effect on the WDM drivers. The default settings are designed to be safe with any modern PC and will only need adjusting if you want to reduce the latency in the system or if you are experiencing glitches. In either case, please see the technical note on buffer settings in Windows USB drivers for a more detailed discussion.
Yes.
You will need to create an aggregate device
For best results, ensure that you set one box as the clock master and the others as slaves. On the USB Audio control app, ensure that the Slave boxes are sync’d to the master with a WCK or DI connection.
If you do this, you should uncheck the ‘Drift Correction’ box.
Multiple Titan and Atlas units can also be connected to a Pro Tools | HDX card, Pro Tools | HD Native PCIe card or Pro Tools | HD Native Thunderbolt unit, and they will to operate in sample sync in Pro Tools | HD software. These interface devices work as Core Audio devices that can be used with software other than Pro Tools | HD.
Multiple Titan and Atlas units fitted with MDIO-Dante modules will operate in sample sync when connected to a Dante system and synchronised correctly. Dante Virtual Soundcard or a Dante PCIe card both can be used as the host interface in system like this.
Operating over USB under ASIO and WDM – No. The ASIO and WDM Audio drivers connect to the first box that the PC detects on the USB bus.
Multiple Titan and Atlas units can be connected to a Pro Tools | HDX card, Pro Tools | HD Native PCIe card or Pro Tools | HD Native Thunderbolt unit, and they will to operate in sample sync in Pro Tools | HD software. These interface devices come with ASIO drivers that can be used with software other than Pro Tools | HD.
Multiple Titan and Atlas units fitted with MDIO-Dante modules will operate in sample sync when connected to a Dante system and synchronised correctly. Dante Virtual Soundcard or a Dante PCIe card both can be used as the host interface in system like this.
Pro Tools requires that you use a power-of-two buffer size: 64, 128, 256, 512, 1024.
You need to set this buffer size in the USB Audio control app before you open Pro Tools.
Once you have done this, you should find that Pro Tools allows you to select Prism Sound USB Audio Class 2.0 as the audio device.
Installing the Lyra, Titan, and Atlas Control Panel app and the Callia firmware updater.
This is a Mac pkg or mpkg file, and under modern MacOS there is a possibility that Security settings may disallow you from installing software that isn’t downloaded from the Apple app store.
In System Preferences / Security & Privacy, the General page has a setting called
“Allow apps downloaded from:”
The options in OSX up to Sierra were:-
App store
App store and identified developers
Anywhere
However in Sierra 10.12.0 and higher, the “Anywhere” option has been removed. Running the “USB Audio Control app” installer package may initially fail under Sierra with a message like this:-
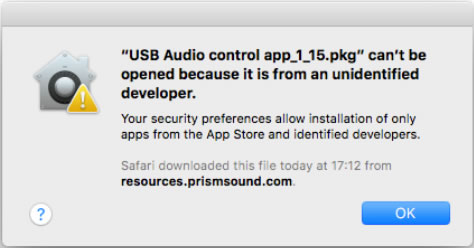
It may fail depending on that setting under an earlier MacOS too.
However when this happens in Sierra, if you go into the Security &
Privacy Preferences, it will now show an option to run this particular
installer package:-
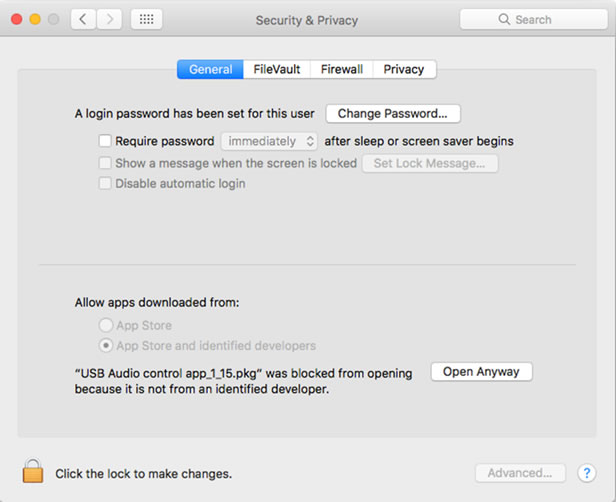
and pressing the “Open anyway” button will run the installer unimpeded.
Windows Vista or later is required.
This message indicates that you are running an older version of Windows, such as Windows XP.
To install firmware, follow these steps:
- Note that the firmware uploading will reset your settings. We suggest that you save them before the firmware upload, so that you can reload them afterwards. Also we advise that you take special care over the volume control if you normally use it. Make sure that you re-assign the volume control and turn it down before playing audio.
- Disconnect the power lead from your box.
- Hold down both the standby button and the volume encoder button whilst reconnecting the power. LEDs will remain off.
- Ensure that the USB cable is connected to the host computer.
- Run the Prism Sound USB control app. You should see the bootloader dialogue pop up.
- Click ‘Browse’ & select a firmware file.
- Click ‘Load’.
- When the load is completed, restart the box by clicking ‘Launch’.
- Reload your settings, and check the operation of the volume control before playing any audio.
Some Windows Vista versions mistakenly associate a Prism Sound USB audio device with Windows’ built-in UAC1 driver rather than the Prism Sound UAC2 driver, even though the UAC2 driver has been installed correctly.
To fix this, you must correct the association manually using the Windows Device Manager:
- Select ‘Control Panel’ from the Windows Start button
- Select ‘System’
- Select ‘Device Manager’
- Scroll down to the list of ‘Sound, video and game controllers’ and expand it
- You should see an entry for ‘Prism Sound [name] USB Audio interface’. Double click this entry to open the ‘Properties’ box
- Select the ‘Driver’ tab
- Click the ‘Update Driver…’ button
- Select ‘Browse my computer for driver software’, followed by ‘Let me pick from a list of device drivers on my computer’
- Highlight the ‘Prism Sound [name] USB Audio interface’ and click the ‘Next’ button.
Windows will now associate the Prism Sound USB Audio driver correctly.
For Windows, you’ll need Vista or later.
Operation under Windows 8, 8.1, 10 and 11 have been tested. It’s always best to use the most recent drivers and firmware, these are necessary for Windows 8, 8.1, 10 and 11. Microsoft have discontinued support for Windows 7 and we are therefore not able to fully support the use of our interfaces under it. Due to some changes in the behaviour of the WDM driver between Windows 7 and Windows11, we recommend that you use the 1.24 driver package if you are continuing to use Windows 7, and not higher versions.
For Mac, OS X 10.5 or later on an Intel platform.
Titan, Lyra and Atlas are fully compliant with Mojave and Catalina when using the recent Control Panel apps and firmware (v2.03 or higher).
There are new security settings in Mojave and higher to allow access to the Microphone and Camera (and these can be changed in Preferences/Security & Privacy/ Privacy). We have come across reports that some DAW software may need access to the microphone in order to record (from any audio input). If users are experiencing issues of this sort, where audio appears in the Prism interface but not in the DAW, it would be best to check the DAW software’s website for any further information.
The Firmware version is reported in the top bar of the Control app.
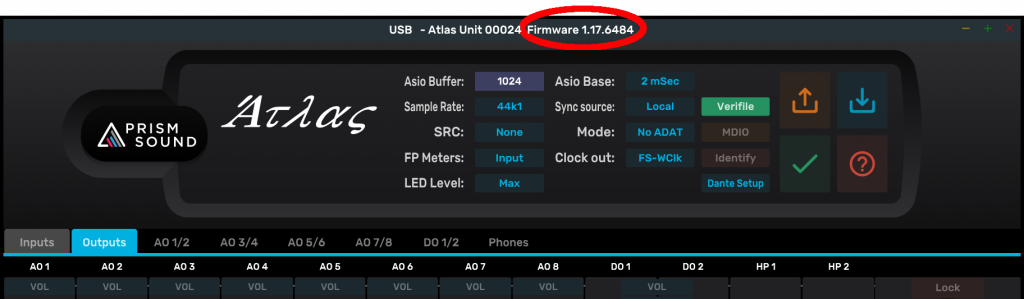
If you are still running the old grey Control app, the firmware version is reported when hover the mouse over the serial number near the top of the Control app. Before you upgrade to v1.17 firmware or higher, you must upgrade the software to the black Control app, version 2.03 or higher first.
Your CPU needs a certain amount of time to process audio samples. We recommend that you optimise your computer for audio processing and disable any unnecessary applications.
For more information, please read the guide to “Optimizing your Windows PC for audio”. See also the technical note on buffer settings in Windows USB drivers for a detailed discussion specific to Prism Sound USB products.
It is very easy to measure the round-trip latency of your audio interface using a DAW and a digital cable.
Use these steps:
- Open your DAW and select your audio interface driver.
- Create a track with outputs set to the interface DO (i.e. outputs 9 & 10).
- Select a clip with a sharp attack, like a snare hit.
- Create another track with inputs set to the interface DI (i.e inputs 9 & 10).
- Arm recording on the second track.
- Connect the digital ports back-to-back using a suitable digital cable.
- Use your transport bar to play & record simultaneously. You will see the clip recorded on the second track, delayed by the round-trip latency.
- Most DAWs have a ‘delay’ value that can be set on the second track. Use this to offset the record time.
- Continue changing the delay time & re-recording the clip until the two clips line up perfectly.
Your delay value will be the precise round-trip latency.
You can verify the delay with a null test. Invert the recorded track & mix with the original; the samples will cancel out exactly.
The ADAT format allows 8 channels of digital audio on a single optical connector, but only at sample rates up to 48kHz.
At 88.2kHz and 96kHz, the S/MUX format must be used instead. S/MUX is a way of squeezing higher frequency signals into an ADAT carrier. Twice as many samples are transmitted for each channel, so there can only be half as many channels.
Starting with driver version 1.05, there are two settings for the buffers. These relate to Windows operation only; you don’t need to set buffers on a Mac as it’s handled automatically. The “base” setting is for the USB connection and relates to both WDM and ASIO operation. The ASIO buffer settings have no effect on the WDM drivers. The default settings are designed to be safe with any modern PC and will only need adjusting if you want to reduce the latency in the system or if you are experiencing glitches. In either case, please see the technical note on buffer settings in Windows USB drivers for a more detailed discussion.
Yes.
You will need to create an aggregate device
For best results, ensure that you set one box as the clock master and the others as slaves. On the USB Audio control app, ensure that the Slave boxes are sync’d to the master with a WCK or DI connection.
If you do this, you should uncheck the ‘Drift Correction’ box.
Multiple Titan and Atlas units can also be connected to a Pro Tools | HDX card, Pro Tools | HD Native PCIe card or Pro Tools | HD Native Thunderbolt unit, and they will to operate in sample sync in Pro Tools | HD software. These interface devices work as Core Audio devices that can be used with software other than Pro Tools | HD.
Multiple Titan and Atlas units fitted with MDIO-Dante modules will operate in sample sync when connected to a Dante system and synchronised correctly. Dante Virtual Soundcard or a Dante PCIe card both can be used as the host interface in system like this.
Operating over USB under ASIO and WDM – No. The ASIO and WDM Audio drivers connect to the first box that the PC detects on the USB bus.
Multiple Titan and Atlas units can be connected to a Pro Tools | HDX card, Pro Tools | HD Native PCIe card or Pro Tools | HD Native Thunderbolt unit, and they will to operate in sample sync in Pro Tools | HD software. These interface devices come with ASIO drivers that can be used with software other than Pro Tools | HD.
Multiple Titan and Atlas units fitted with MDIO-Dante modules will operate in sample sync when connected to a Dante system and synchronised correctly. Dante Virtual Soundcard or a Dante PCIe card both can be used as the host interface in system like this.
Pro Tools requires that you use a power-of-two buffer size: 64, 128, 256, 512, 1024.
You need to set this buffer size in the USB Audio control app before you open Pro Tools.
Once you have done this, you should find that Pro Tools allows you to select Prism Sound USB Audio Class 2.0 as the audio device.
Installing the Lyra, Titan, and Atlas Control Panel app and the Callia firmware updater.
This is a Mac pkg or mpkg file, and under modern MacOS there is a possibility that Security settings may disallow you from installing software that isn’t downloaded from the Apple app store.
In System Preferences / Security & Privacy, the General page has a setting called
“Allow apps downloaded from:”
The options in OSX up to Sierra were:-
App store
App store and identified developers
Anywhere
However in Sierra 10.12.0 and higher, the “Anywhere” option has been removed. Running the “USB Audio Control app” installer package may initially fail under Sierra with a message like this:-
It may fail depending on that setting under an earlier MacOS too.
However when this happens in Sierra, if you go into the Security &
Privacy Preferences, it will now show an option to run this particular
installer package:-
and pressing the “Open anyway” button will run the installer unimpeded.
Windows Vista or later is required.
This message indicates that you are running an older version of Windows, such as Windows XP.
To install firmware, follow these steps:
- Note that the firmware uploading will reset your settings. We suggest that you save them before the firmware upload, so that you can reload them afterwards. Also we advise that you take special care over the volume control if you normally use it. Make sure that you re-assign the volume control and turn it down before playing audio.
- Disconnect the power lead from your box.
- Hold down both the standby button and the volume encoder button whilst reconnecting the power. LEDs will remain off.
- Ensure that the USB cable is connected to the host computer.
- Run the Prism Sound USB control app. You should see the bootloader dialogue pop up.
- Click ‘Browse’ & select a firmware file.
- Click ‘Load’.
- When the load is completed, restart the box by clicking ‘Launch’.
- Reload your settings, and check the operation of the volume control before playing any audio.
Some Windows Vista versions mistakenly associate a Prism Sound USB audio device with Windows’ built-in UAC1 driver rather than the Prism Sound UAC2 driver, even though the UAC2 driver has been installed correctly.
To fix this, you must correct the association manually using the Windows Device Manager:
- Select ‘Control Panel’ from the Windows Start button
- Select ‘System’
- Select ‘Device Manager’
- Scroll down to the list of ‘Sound, video and game controllers’ and expand it
- You should see an entry for ‘Prism Sound [name] USB Audio interface’. Double click this entry to open the ‘Properties’ box
- Select the ‘Driver’ tab
- Click the ‘Update Driver…’ button
- Select ‘Browse my computer for driver software’, followed by ‘Let me pick from a list of device drivers on my computer’
- Highlight the ‘Prism Sound [name] USB Audio interface’ and click the ‘Next’ button.
Windows will now associate the Prism Sound USB Audio driver correctly.
For Windows, you’ll need Vista or later.
Operation under Windows 8, 8.1, 10 and 11 have been tested. It’s always best to use the most recent drivers and firmware, these are necessary for Windows 8, 8.1, 10 and 11. Microsoft have discontinued support for Windows 7 and we are therefore not able to fully support the use of our interfaces under it. Due to some changes in the behaviour of the WDM driver between Windows 7 and Windows11, we recommend that you use the 1.24 driver package if you are continuing to use Windows 7, and not higher versions.
For Mac, OS X 10.5 or later on an Intel platform.
Titan, Lyra and Atlas are fully compliant with Mojave and Catalina when using the recent Control Panel apps and firmware (v2.03 or higher).
There are new security settings in Mojave and higher to allow access to the Microphone and Camera (and these can be changed in Preferences/Security & Privacy/ Privacy). We have come across reports that some DAW software may need access to the microphone in order to record (from any audio input). If users are experiencing issues of this sort, where audio appears in the Prism interface but not in the DAW, it would be best to check the DAW software’s website for any further information.
The Firmware version is reported in the top bar of the Control app.
If you are still running the old grey Control app, the firmware version is reported when hover the mouse over the serial number near the top of the Control app. Before you upgrade to v1.17 firmware or higher, you must upgrade the software to the black Control app, version 2.03 or higher first.