For optimum performance the DA-2 should be connected to an unbalanced
input using only pins 1 and 2. Pin 2 should connect to the signal
conductor and pin 1 should connect to the ground or return. The signal
level is then halved.
NOTE : Use of output pin 3 instead of 2 will result in phase inversion.
It is possible to drive unbalanced inputs from pins 2 and 3 but this unbalances the output and can lead to hum. In any case do not connect any of the three output pins to each other.
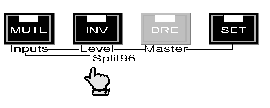
Holding the “Set” button down while
pressing one of the three adjacent switches puts the unit into one of
the following control modes: Either Set Inputs, Set Level, or Set
Master, as described by the red front-panel legends. These modes allow
the user to modify the configuration of the DA-2. In normal use they
are not required.
Set Inputs mode
The Set Inputs mode is used to enable or disable the selection of individual digital inputs to avoid cycling through unused inputs when switching between sources. (Note: in this mode the MUTE button has the function of enabling the inputs. For that reason it is referred to as the MUTE/Inputs control.)
To enter Set Inputs mode, the
DA-2 must first be in normal mode (i.e. if the SET control is not
already illuminated). While holding the SET button down, press the
MUTE/Inputs button. This mode is indicated by both the MUTE/Inputs and
the SET LEDs being lit.
The seven input indicators on the left of the unit illuminate to indicate the inputs that are enabled. One (or two) of the indicators will be flickering to show the input(s) selected for enabling or disabling. Press the MUTE/Inputs control to toggle the enable state of this(these) input(s). The flickering will toggle between fast (mostly on), indicating enabled and slow (mostly off) indicating disabled.
Press the Select button to cycle
through the other inputs so that they can then be enabled or disabled
using MUTE/Inputs.
Inputs DI2 and DI3 (the second
and third AES3 XLR inputs) can be configured as a ‘Split96’ input (see
below). If configured for Split96 operation when selecting inputs for
enabling or disabling, the indicators for DI2 and DI3 will operate
together.
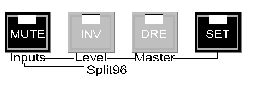
Split96 Sources
Once in SET Inputs mode (see
above), press the INV/Split96 button, to change the mode of inputs 2
and 3 for either Split96 (2-wire) or normal (1-wire) operation.
In Split96 mode, two AES3 bearers
both at 44.1kHz or 48kHz carry a stereo 88.2kHz- or 96kHz-sampled
signal, with one channel carried on each bearer as described in ref. 8.
“Split96” or “2-wire AES” sources may only be connected to Inputs 2
& 3.
Split96 mode (for DI2 & DI3
only) is indicated once in Set Inputs mode by the INV/Split96 LED being
ON. Thereafter, inputs DI2 and DI3 are treated as a Split96 pair unless
the INV/Level (Split96) button is used again to separate them – this is
irrespective of the mode expressed in the channel status.
In Split96 mode input 2 carries
the left channel and input 3 carries the right channel.
Split96 mode is only available on
inputs 2 & 3 and the Split96 indication does not change while in
SET Inputs mode if other inputs are selected for enabling or disabling.
NOTE: When XLR inputs DI2 and DI3
are configured for Split96 operation, the digital XLR outputs, DO1 and
DO2 are automatically set to provide Split96 output if the DA-2 is
operating at 88.2kHz or 96kHz. Output channel status in this mode is in
accordance with the proposed recommendations in Draft AES3-1992
Amendment 3-xxxx – Serial Transmission Format for Two-Channel Linearly
Represented Digital Audio Data’ (still in preparation, July 1998).
Press SET to leave Set Inputs
mode and return to normal mode.
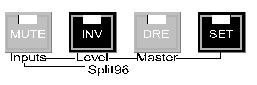
Set Level mode sets the maximum analogue output level for a full-scale digital input. Range is from +5dBu to +28dBu in either 1dB steps or fine steps of 0.05dB.
To enter Set Level mode, the DA-2
must first be in normal mode (i.e. if the SET control is not already
illuminated). While holding the SET button down, press the INV/Level
button. Set Level mode is indicated when both INV/Level and SET LEDs
are lit.
In this mode, the seven selector
lights at the left hand side will show a pattern that relates to the
output level. The text in red under the LEDs indicates the value of
each LED. The maximum output level (in dBu) is calculated by adding the
value of all the LEDs that are on. (Remember that when connecting to an
unbalanced input the output level will be attenuated by 6dB.)
Setting the maximum output level
To set the maximum output level,
press the Select button repeatedly until the desired level is reached.
Each press will raise the level
by 1dB until +28dBu, beyond which the level will return to +5dBu.
Fine output level
adjustment
To make a fine level adjustment
hold down the INV/Level control while pressing the Select button. Each
time Select is pressed a level adjustment of -0.05dB is applied until
-0.95dB, beyond which the trim returns to zero. The trim value is not
displayed. If the trim is active, INV/Level will flash when in Set
Level mode.
The fine trim can be cleared by
pressing the Select button once in Set Level mode. The INV/Level LED
will then cease flashing and remain lit. Subsequent operations of
Select will apply the normal +1dB gain step for setting the maximum
output level.
Note that the best dynamic range
is achieved when one of the standard levels (+12, +18, +22, +28) is
used and the other LEDs (-4, -2, -1) are not illuminated. The latter
LEDs show the amount of digital attenuation that has been applied. As
this attenuation lowers the maximum level but not the noise floor it
reduces the dynamic range by that amount. For example, with a level
setting of +13 dBu the analogue level is set to +18dBu with a digital
attenuation of 5dBu. Therefore the dynamic range is reduced by 5dB
compared with the +18dBu setting.
Press SET to leave Set Level mode
and return to normal mode.
Your CPU needs a certain amount of time to process audio samples. We recommend that you optimise your computer for audio processing and disable any unnecessary applications.
It is possible to use any available output of a FireWire Core Audio interface from within macOS. For example, if you wanted to play iTunes out from the Orpheus S/PDIF outputs, you would do this:
Connect Orpheus and go into Audio MIDI Setup (AMS) in macOS
Select ‘Properties For: Orpheus’
Go into ‘Configure Speakers’. You should have a list of all the available outputs of Orpheus listed.
Check the box next to SPDIF (outputs 9-10)
Below this list is the speaker configuration, make sure you have stereo selected
beneath each speaker you will be able to select the output depending on which outputs you checked in the above list. Select S9 for the left speaker and S10 for the right speaker.
After making changes of this kind, you may find that you need to re-start your audio applications in order for the changes to take effect.
WDM drivers still connect to channels pairs individually. The ASIO
driver will automatically combine all audio channels into a single
interface. You may need to re-start your DAW in order to detect the
additional channels.
macOS
You need to ensure that all units are running at the desired sample rate using CSP sync before daisy-chaining them:
Connect a single interface to your Mac and ensure that power is connected. Wait until it appears on the control panel.
Ensure that it has the latest firmware installed
Set the sync source to CSP (using control panel) and set the sample rate. Save all settings by putting Orpheus into standby, then back to normal.
Disconnect the FireWire cable but keep your interface powered. Wait for control panel to go blank.
Repeat above steps for every additional interface.
Daisy-chain all of the units together. The first interface should be connected to your Mac, the second connected to the first one, and so on.
If devices fall off the FireWire bus during the final step, disconnect power from all units, reboot your Mac and begin again from the top.
Note that you need to set all units to the same sample rate otherwise some channels will not be available. Use the Orpheus control panel to change sample rate for all units, or use the aggregate device sample rate (which can be set from your DAW).
Please also note that your interfaces must be used as the clock master because CSP sync is required. If you have external digital devices, you must synchronise them from wordclock or digital outputs.
It is not recommended to use FireWire interfaces with multiple Core Audio applications unless you are running Snow Leopard (macOS 10.6).
Prior to Snow Leopard, macOS has a bug that results in audio degradation when a class-compliant FireWire audio device is connected to two or more Core Audio clients at the same time. For example, you could experience drop-outs in Logic Pro if iTunes is also being used in the background.
We recommend that you only connect to a single Core Audio application at a time. Please also ensure that Orpheus/ADA-8 is not your default recording or playback device in order to prevent accidental connection.
Apple have confirmed that this bug is fixed in Snow Leopard.