For optimum performance the DA-2 should be connected to an unbalanced
input using only pins 1 and 2. Pin 2 should connect to the signal
conductor and pin 1 should connect to the ground or return. The signal
level is then halved.
NOTE : Use of output pin 3 instead of 2 will result in phase inversion.
It is possible to drive unbalanced inputs from pins 2 and 3 but this unbalances the output and can lead to hum. In any case do not connect any of the three output pins to each other.
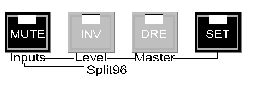
Holding the “Set” button down while
pressing one of the three adjacent switches puts the unit into one of
the following control modes: Either Set Inputs, Set Level, or Set
Master, as described by the red front-panel legends. These modes allow
the user to modify the configuration of the DA-2. In normal use they
are not required.
Set Inputs mode
The Set Inputs mode is used to enable or disable the selection of individual digital inputs to avoid cycling through unused inputs when switching between sources. (Note: in this mode the MUTE button has the function of enabling the inputs. For that reason it is referred to as the MUTE/Inputs control.)
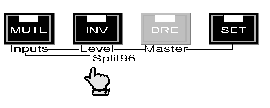
To enter Set Inputs mode, the
DA-2 must first be in normal mode (i.e. if the SET control is not
already illuminated). While holding the SET button down, press the
MUTE/Inputs button. This mode is indicated by both the MUTE/Inputs and
the SET LEDs being lit.
The seven input indicators on the left of the unit illuminate to indicate the inputs that are enabled. One (or two) of the indicators will be flickering to show the input(s) selected for enabling or disabling. Press the MUTE/Inputs control to toggle the enable state of this(these) input(s). The flickering will toggle between fast (mostly on), indicating enabled and slow (mostly off) indicating disabled.
Press the Select button to cycle
through the other inputs so that they can then be enabled or disabled
using MUTE/Inputs.
Inputs DI2 and DI3 (the second
and third AES3 XLR inputs) can be configured as a ‘Split96’ input (see
below). If configured for Split96 operation when selecting inputs for
enabling or disabling, the indicators for DI2 and DI3 will operate
together.
Split96 Sources
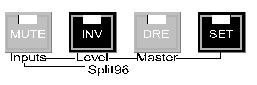
Once in SET Inputs mode (see
above), press the INV/Split96 button, to change the mode of inputs 2
and 3 for either Split96 (2-wire) or normal (1-wire) operation.
In Split96 mode, two AES3 bearers
both at 44.1kHz or 48kHz carry a stereo 88.2kHz- or 96kHz-sampled
signal, with one channel carried on each bearer as described in ref. 8.
“Split96” or “2-wire AES” sources may only be connected to Inputs 2
& 3.
Split96 mode (for DI2 & DI3
only) is indicated once in Set Inputs mode by the INV/Split96 LED being
ON. Thereafter, inputs DI2 and DI3 are treated as a Split96 pair unless
the INV/Level (Split96) button is used again to separate them – this is
irrespective of the mode expressed in the channel status.
In Split96 mode input 2 carries
the left channel and input 3 carries the right channel.
Split96 mode is only available on
inputs 2 & 3 and the Split96 indication does not change while in
SET Inputs mode if other inputs are selected for enabling or disabling.
NOTE: When XLR inputs DI2 and DI3
are configured for Split96 operation, the digital XLR outputs, DO1 and
DO2 are automatically set to provide Split96 output if the DA-2 is
operating at 88.2kHz or 96kHz. Output channel status in this mode is in
accordance with the proposed recommendations in Draft AES3-1992
Amendment 3-xxxx – Serial Transmission Format for Two-Channel Linearly
Represented Digital Audio Data’ (still in preparation, July 1998).
Press SET to leave Set Inputs
mode and return to normal mode.
Set Level mode sets the maximum analogue output level for a full-scale digital input. Range is from +5dBu to +28dBu in either 1dB steps or fine steps of 0.05dB.
To enter Set Level mode, the DA-2
must first be in normal mode (i.e. if the SET control is not already
illuminated). While holding the SET button down, press the INV/Level
button. Set Level mode is indicated when both INV/Level and SET LEDs
are lit.
In this mode, the seven selector
lights at the left hand side will show a pattern that relates to the
output level. The text in red under the LEDs indicates the value of
each LED. The maximum output level (in dBu) is calculated by adding the
value of all the LEDs that are on. (Remember that when connecting to an
unbalanced input the output level will be attenuated by 6dB.)
Setting the maximum output level
To set the maximum output level,
press the Select button repeatedly until the desired level is reached.
Each press will raise the level
by 1dB until +28dBu, beyond which the level will return to +5dBu.
Fine output level
adjustment
To make a fine level adjustment
hold down the INV/Level control while pressing the Select button. Each
time Select is pressed a level adjustment of -0.05dB is applied until
-0.95dB, beyond which the trim returns to zero. The trim value is not
displayed. If the trim is active, INV/Level will flash when in Set
Level mode.
The fine trim can be cleared by
pressing the Select button once in Set Level mode. The INV/Level LED
will then cease flashing and remain lit. Subsequent operations of
Select will apply the normal +1dB gain step for setting the maximum
output level.
Note that the best dynamic range
is achieved when one of the standard levels (+12, +18, +22, +28) is
used and the other LEDs (-4, -2, -1) are not illuminated. The latter
LEDs show the amount of digital attenuation that has been applied. As
this attenuation lowers the maximum level but not the noise floor it
reduces the dynamic range by that amount. For example, with a level
setting of +13 dBu the analogue level is set to +18dBu with a digital
attenuation of 5dBu. Therefore the dynamic range is reduced by 5dB
compared with the +18dBu setting.
Press SET to leave Set Level mode
and return to normal mode.
You can see how this popup was set up in our step-by-step guide: https://wppopupmaker.com/guides/auto-opening-announcement-popups/
You can see how this popup was set up in our step-by-step guide: https://wppopupmaker.com/guides/auto-opening-announcement-popups/
You can see how this popup was set up in our step-by-step guide: https://wppopupmaker.com/guides/auto-opening-announcement-popups/
You can see how this popup was set up in our step-by-step guide: https://wppopupmaker.com/guides/auto-opening-announcement-popups/
You can see how this popup was set up in our step-by-step guide: https://wppopupmaker.com/guides/auto-opening-announcement-popups/
You can see how this popup was set up in our step-by-step guide: https://wppopupmaker.com/guides/auto-opening-announcement-popups/