ADA-128 CONFIGURATOR
I/O Modular Expansion
Configure your own Custom ADA-128 setup.
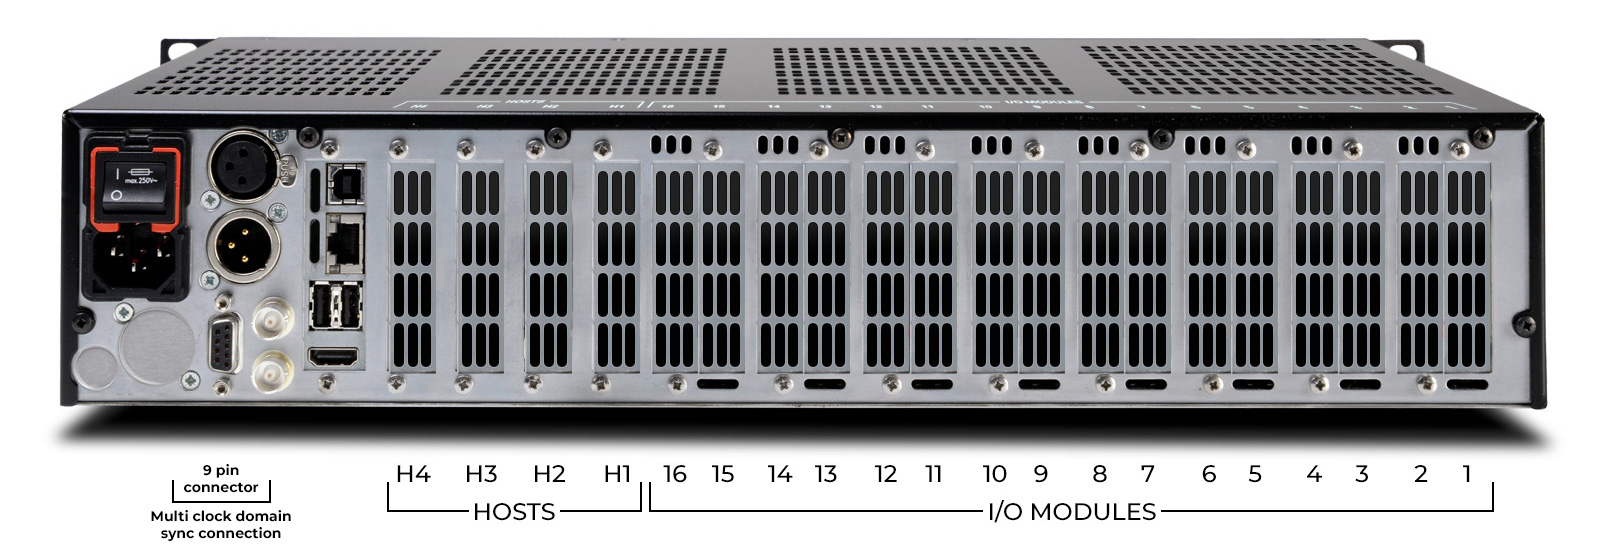
Click on one of the circular hotspots on the image of the unit’s rear panel (below). Then choose which type of card you wish to add to the relevant slot, from the dropdown list underneath the Dream ADA-128 unit.
Click here to take a look at some Prism Sound ADA-128 Configuration Presets (below).
Icons:
![]() PTHDX Card
PTHDX Card
![]() Dante Card
Dante Card
![]() Analogue In
Analogue In
![]() Analogue Out
Analogue Out
Please add your “9 Pin multi clock lead” selection if you wish to purchase this cable with your unit.
![]() No Lead
No Lead

-
Unit Hardware
-
ADA-128 Unit
-
-
Host Slot H4
-

H4 Empty
-

H4 PTHDX
-

H4 Dante
-

H4 AES
-
-
Host Slot H3
-

H3 Empty
-

H3 PTHDX
-

H3 Dante
-

H3 AES
-
-
Host Slot H2
-

H2 Empty
-

H2 PTHDX
-

H2 Dante
-

H2 AES
-
-
Host Slot H1
-

H1 Empty
-

H1 PTHDX
-

H1 Dante
-

H1 AES
-
-
I/O Slot 16
-

16 Empty
-

16 AES
-

16 Analogue In
-

16 Analogue Out
-
-
I/O Slot 15
-

15 Empty
-

15 AES
-

15 Analogue In
-

15 Analogue Out
-
-
I/O Slot 14
-

14 Empty
-

14 AES
-

14 Analogue In
-

14 Analogue Out
-
-
I/O Slot 13
-

13 Empty
-

13 AES
-

13 Analogue In
-

13 Analogue Out
-
-
I/O Slot 12
-

12 Empty
-

12 AES
-

12 Analogue In
-

12 Analogue Out
-
-
I/O Slot 11
-

11 Empty
-

11 AES
-

11 Analogue In
-

11 Analogue Out
-
-
I/O Slot 10
-

10 Empty
-

10 AES
-

10 Analogue In
-

10 Analogue Out
-
-
I/O Slot 09
-

09 Empty
-

09 AES
-

09 Analogue In
-

09 Analogue Out
-
-
I/O Slot 08
-

08 Empty
-

08 AES
-

08 Analogue In
-

08 Analogue Out
-
-
I/O Slot 07
-

07 Empty
-

07 AES
-

07 Analogue In
-

07 Analogue Out
-
-
I/O Slot 06
-

06 Empty
-

06 AES
-

06 Analogue In
-

06 Analogue Out
-
-
I/O Slot 05
-

05 Empty
-

05 AES
-

05 Analogue In
-

05 Analogue Out
-
-
I/O Slot 04
-

04 Empty
-

04 AES
-

04 Analogue In
-

04 Analogue Out
-
-
I/O Slot 03
-

03 Empty
-

03 AES
-

03 Analogue In
-

03 Analogue Out
-
-
I/O Slot 02
-

02 Empty
-

02 AES
-

02 Analogue In
-

02 Analogue Out
-
-
I/O Slot 01
-

01 Empty
-

01 AES
-

01 Analogue In
-

01 Analogue Out
-
-
Multi Clock Lead
-

No Lead
-

Lead Required
-
Note: The “9 Pin multi clock lead” is an optional accessory.
Additional sync connections are required to utilize ADA-128s multiple clock domains. Please add your selection if you wish to purchase this cable with your unit.
Below is a set of Prism Sound’s “Inspiration” Dream ADA-128 Presets.
Click and drag left-to-right or click on the set of dots to see what presets Prism Sound suggests. Then simply click on the relevant “select” button to apply that preset onto the configurator. Alternatively, scroll up to the manual configurator (above), to create your own custom config.


